Automatic Feeder Not Working? Complete Troubleshooting Guide (2026)
- ⏱️ Time needed: 5-30 minutes per issue
- 📊 Difficulty: Beginner-friendly
- 🛠️ Tools you may need: Small screwdriver, compressed air, dry cloth, fresh batteries
Your automatic pet feeder not working right when you need it most? Don’t panic. After testing and maintaining 25+ automatic feeders over two years, we’ve seen every failure mode there is. This guide covers the 12 most common problems with step-by-step fixes that work across all major brands—PetLibro, PetSafe, WOPET, Petkit, CATLINK, and Cat Mate.
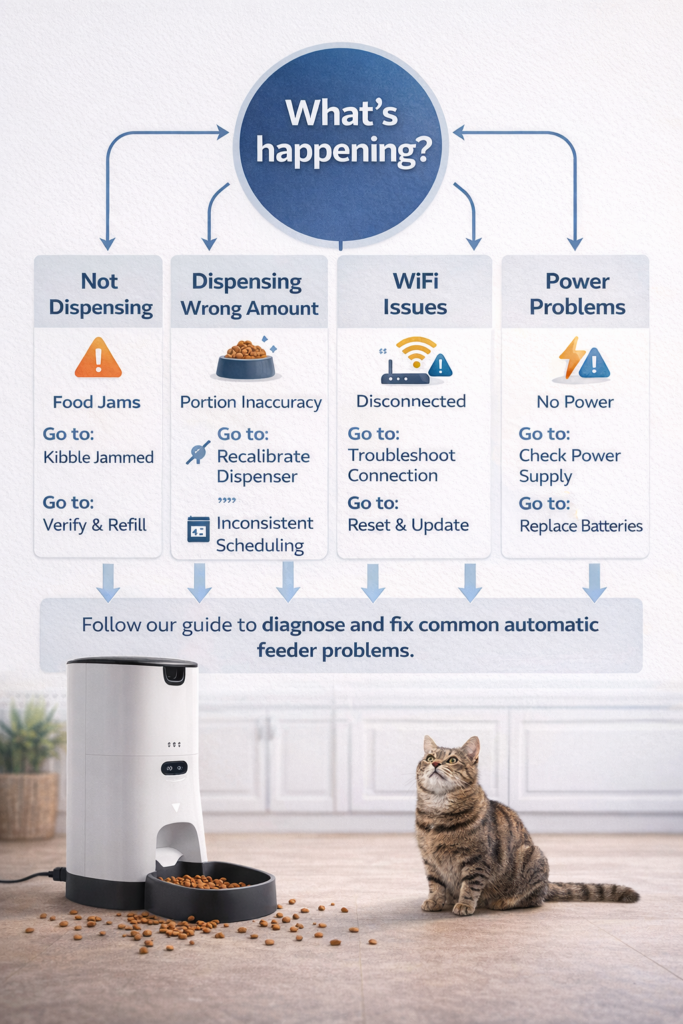
Quick Diagnosis: Find Your Problem Fast
| Symptom | Likely Cause | Jump To |
|---|---|---|
| No food coming out | Jam, power issue, or empty hopper | Problem #1 |
| Too much or too little food | Calibration or kibble size | Problem #2 |
| WiFi won’t connect | 5GHz band, range, or app issue | Problem #3 |
| App not syncing or controlling feeder | Server, firmware, or connection | Problem #4 |
| Feeder runs on schedule but pet not eating | Bowl placement, noise, or food freshness | Problem #5 |
| Strange grinding or loud noise | Motor strain, foreign object, or wear | Problem #6 |
| Feeder dispenses at wrong times | Clock drift, timezone, or schedule error | Problem #7 |
| Battery backup not working | Dead batteries, corrosion, or wrong type | Problem #8 |
| Power outage — feeder stopped | No battery backup or batteries depleted | Problem #9 |
| Food going stale in hopper | Seal issue, humidity, or capacity too large | Problem #10 |
| Cat/dog breaking into feeder | Lid security, weight, or design flaw | Problem #11 |
| Feeder completely dead | Internal failure or warranty issue | Problem #12 |
Problem #1: Feeder Not Dispensing Food
This is the number one complaint with automatic feeders. The motor runs, but no food comes out—or food comes out inconsistently.
Step-by-Step Fix
Step 1: Check the obvious
- Is the hopper empty? (Sounds basic, but it accounts for 20% of “feeder broken” complaints)
- Is the hopper properly seated and locked in place?
- Is the feeder plugged in / batteries charged?
Step 2: Clear the jam
- Unplug the feeder (safety first)
- Remove the food hopper from the base
- Look into the dispensing chute—you’ll usually see stuck kibble
- Clear all stuck pieces by hand or with a chopstick
- Use compressed air to blow out small crumbs and dust
- Reassemble and run a manual test dispense
Step 3: Prevent future jams
| Cause | Prevention |
|---|---|
| Kibble too large (>15mm) | Switch to smaller kibble (5-12mm works best) |
| Overfilled hopper | Never fill past the MAX line |
| Humidity clumping | Add a food-safe desiccant pack on top of kibble |
| Mixed kibble shapes | Use a single uniform kibble shape |
| Dust accumulation | Clean dispensing mechanism weekly |
💡 Pro Tip: Run a manual dispense test every time you refill the hopper. This catches potential jams before they affect a scheduled meal.
For feeder-specific jam solutions, check our preventing food jams guide.
Problem #2: Dispensing Too Much or Too Little Food
Portion accuracy varies wildly between feeders—from ±1g (premium) to ±10g (budget). But even good feeders can drift if not calibrated properly.
Step-by-Step Fix
Step 1: Weigh actual output
- Set a portion in the app (e.g., 25g)
- Place a kitchen scale under the bowl
- Run 5 manual dispenses and record each weight
- Calculate the average and deviation
Step 2: Recalibrate
| Brand | How to Recalibrate |
|---|---|
| PetLibro | App → Settings → Portion Calibration → Follow on-screen steps |
| PetSafe | App → Feeder → Serving Size → Adjust manually based on weighed output |
| WOPET | App → Device → Calibrate → Run test portions |
| Petkit | App → Settings → Food Amount → Calibrate with your kibble type |
Step 3: Account for kibble size
Different kibble brands dispense differently through the same feeder:
| Kibble Size | Typical Effect | Adjustment |
|---|---|---|
| Small (3-5mm) | Over-dispenses by 10-20% | Reduce portion setting |
| Medium (5-12mm) | Most accurate | Standard setting |
| Large (12-15mm) | Under-dispenses or jams | Increase setting or switch kibble |
| Irregular shapes | Inconsistent portions | Use round/uniform kibble |
⚠️ Important: Always recalibrate when switching kibble brands. A portion of “25g” with Brand A may dispense 30g with Brand B.
Problem #3: WiFi Won’t Connect
WiFi connectivity is the second most common complaint with smart pet feeders. Here’s the fix that works 90% of the time.
The #1 Cause: Your Feeder Doesn’t Support 5GHz
Almost every automatic pet feeder on the market only supports 2.4GHz WiFi. If your router broadcasts a single combined network (common with newer mesh routers), the feeder may try to connect on 5GHz and fail.
Step-by-Step Fix
Step 1: Verify your WiFi band
- Log in to your router admin panel (usually 192.168.1.1 or 192.168.0.1)
- Check if 2.4GHz and 5GHz are separate SSIDs or combined
- If combined: Create a separate 2.4GHz-only network for smart devices
Step 2: Proper setup procedure
- Place feeder within 3 meters of router during initial setup
- Ensure your phone is connected to the 2.4GHz network
- Enable Bluetooth and Location Services on your phone (required by most feeder apps)
- Open the feeder app and follow pairing steps
- Wait up to 60 seconds for connection (don’t abort early)
Step 3: If still not connecting
| Action | Details |
|---|---|
| Power cycle feeder | Unplug for 30 seconds, plug back in |
| Power cycle router | Unplug router for 60 seconds |
| Update app | Check App Store/Google Play for updates |
| Reset feeder WiFi | Hold WiFi/reset button 5-10 seconds until LED blinks |
| Check WiFi password | Special characters (!, @, #) sometimes cause issues—try a simpler password |
| Check router capacity | Some routers limit connected devices (check if >20 devices connected) |
Step 4: For persistent issues
- Add a WiFi extender near the feeder location
- Switch router to WPA2 security (some feeders don’t support WPA3)
- Contact manufacturer support with your router model info
-
Sale!
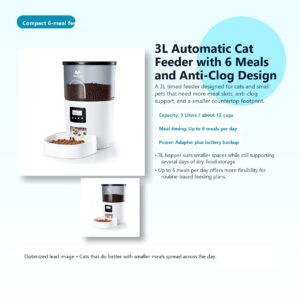
3L Automatic Cat Feeder with 6 Meals and Anti-Clog Design
Original price was: $30.99.$24.79Current price is: $24.79. Add to cart -
Sale!
Veken Stainless Steel Automatic Pet Fountain
Original price was: $27.98.$22.38Current price is: $22.38. Add to cart -
Sale!
App-Control Self-Cleaning Litter Box with Weight Monitoring and Anti-Pinch Safety
Original price was: $149.98.$104.99Current price is: $104.99. Add to cart
Problem #4: App Not Syncing or Controlling Feeder
Your feeder is connected to WiFi but the app shows “offline,” won’t update schedules, or doesn’t reflect actual feedings.
Step-by-Step Fix
Step 1: Basic checks
- Force close and reopen the app
- Check if the manufacturer’s servers are down (look on their social media or Down Detector)
- Ensure your phone has internet access
Step 2: Re-sync
- In the app, pull down to refresh device status
- If still offline: delete the feeder from the app and re-add it
- Check for firmware updates (App → Device → Settings → Firmware)
Step 3: Brand-specific fixes
| Brand | Common App Issue | Fix |
|---|---|---|
| PetLibro | “Device offline” after router restart | Re-pair in app → Add Device |
| PetSafe | Schedule changes not saving | Force close app, clear cache, retry |
| WOPET | Camera feed not loading | Check WiFi upload speed (need >2Mbps) |
| Petkit | App stuck on “connecting” | Log out, reinstall app, log back in |
| CATLINK | Firmware update failed | Hold reset 15s, re-pair from scratch |
💡 Pro Tip: Even when the app fails, most feeders continue running their locally saved schedule. Your pet won’t miss a meal just because the app is down.
Problem #5: Feeder Works But Pet Won’t Eat From It
The feeder is functioning perfectly, but your cat or dog refuses to go near it. This is more common than you’d think—especially with cats.
Common Causes and Fixes
| Cause | Signs | Fix |
|---|---|---|
| Motor noise scares them | Pet flinches when feeder activates | Place feeder in a familiar, quiet spot; run dispenses while pet is in another room for first few days |
| Unfamiliar object | Pet avoids the area entirely | Leave the feeder unplugged for 3-5 days so pet can investigate |
| Bowl material | Pet sniffs but won’t eat | Switch to stainless steel bowl (some cats dislike plastic due to smell or whisker fatigue) |
| Food taste changed | Pet eats from other bowls but not feeder | Kibble may absorb plastic or rubber odors—clean hopper thoroughly |
| Location | Pet approaches cautiously | Move feeder to where their old bowl was |
7-Day Transition Plan
| Day | Action |
|---|---|
| 1-2 | Place feeder (unplugged) next to their current food bowl |
| 3-4 | Put treats inside the feeder bowl (still unplugged) |
| 5 | Plug in feeder, manually dispense while pet watches from a distance |
| 6 | Set one automatic meal while also leaving their regular bowl |
| 7+ | Remove regular bowl; feeder only |
“Cats are creatures of habit. A gradual transition over 5-7 days dramatically improves acceptance rates versus abrupt changes.” — Dr. Sarah Chen, DVM
Problem #6: Strange Grinding or Loud Noises
Some motor noise during dispensing is normal. But if you hear grinding, clicking, or high-pitched whining, something needs attention.
Diagnosis by Sound
| Sound | Likely Cause | Fix |
|---|---|---|
| Grinding | Kibble fragments stuck in gears | Disassemble dispensing mechanism, clean thoroughly |
| Clicking | Motor gear skipping | Small jam or motor wear—clear obstruction, or contact support if persistent |
| High-pitched whine | Motor straining against blockage | Clear jam immediately to prevent motor burnout |
| Rattling | Loose hopper or bowl | Re-seat hopper, check all connections are snug |
| Continuous running | Motor stuck in “on” state | Unplug immediately, hard reset, contact support |
Cleaning the Dispensing Mechanism
- Unplug and remove the hopper
- Remove the dispensing wheel/impeller (usually twists off)
- Clean all kibble dust and oil residue with warm water and mild soap
- Dry completely before reassembling
- Apply a tiny amount of food-safe silicone lubricant if the mechanism feels stiff (optional)
⚠️ Warning: If the motor runs continuously without stopping, unplug the feeder immediately. This indicates an electrical fault that could damage the motor or overheat.
Problem #7: Feeder Dispenses at Wrong Times
You set feeding for 8:00 AM but the feeder goes off at 3:00 AM—or not at all.
Common Causes and Fixes
| Cause | Fix |
|---|---|
| Wrong timezone in app | App → Settings → Timezone → Set to your local timezone |
| Daylight saving time | Update app after DST changes; some feeders auto-adjust, others don’t |
| Clock drift (non-WiFi feeders) | Reset the clock monthly; battery-powered clocks can drift 1-2 minutes/month |
| Multiple schedules conflicting | Delete all schedules and recreate from scratch |
| Firmware bug | Update firmware; check manufacturer forums for known issues |
| AM/PM confusion | Double-check 12-hour vs 24-hour format in settings |
💡 Pro Tip: WiFi-connected feeders sync time automatically with internet servers—another reason to choose a wifi pet feeder with app over offline models.
Problem #8: Battery Backup Not Working
You installed backup batteries, but when the power went out, the feeder stopped anyway.
Step-by-Step Fix
Step 1: Check battery basics
| Issue | Fix |
|---|---|
| Dead batteries | Replace with brand new, name-brand batteries (Duracell, Energizer) |
| Wrong battery type | Check manual—most feeders use D or C cells, not rechargeable |
| Corroded contacts | Clean contacts with white vinegar on a cotton swab, then dry thoroughly |
| Batteries installed backwards | Remove and reinstall checking +/- orientation |
Step 2: Test backup function
- Install fresh batteries
- Ensure feeder is working on AC power
- Unplug the AC adapter
- Feeder should continue operating on battery within 1-2 seconds
- If not: try a different set of batteries, or the battery contact springs may be damaged
Step 3: Battery maintenance schedule
| Task | Frequency |
|---|---|
| Test battery backup | Monthly |
| Replace batteries | Every 6 months (or sooner if low indicator shows) |
| Check for corrosion | Every 3 months |
| Remove batteries if storing feeder | Before any extended storage |
⚠️ Important for travel: Always install fresh batteries before leaving on vacation. Don’t rely on batteries that have been sitting in the feeder for months. See our best feeders for vacation guide for more travel tips.
Problem #9: Power Outage — Feeder Stopped Completely
No battery backup? Here’s what to do when the power comes back—and how to prevent this crisis.
Immediate Recovery
- When power returns, check if the feeder resumes its schedule automatically (most WiFi models do)
- If not: manually dispense a portion to feed your pet immediately
- Verify the clock/schedule is still correct (power loss can reset non-WiFi models)
- Check if any scheduled meals were missed and compensate
Prevention Plan
| Solution | Cost | Reliability |
|---|---|---|
| Feeder with battery backup | $0 (built-in) | ⭐⭐⭐⭐⭐ |
| UPS (uninterruptible power supply) | $30-50 | ⭐⭐⭐⭐⭐ |
| Smart plug with outage alerts | $15-25 | Alerts only (no power) |
| Second gravity feeder as backup | $10-15 | ⭐⭐⭐ (no portion control) |
💡 Best setup: A WiFi feeder with battery backup + a smart plug that sends power outage notifications to your phone. Total redundancy costs under $30 extra.
Problem #10: Food Going Stale in Hopper
You notice your pet eating less enthusiastically, or the kibble looks and smells different after sitting in the hopper for a while.
Causes and Solutions
| Cause | Solution |
|---|---|
| Humidity | Place a food-safe desiccant pack on top of the kibble |
| Hopper not sealed | Check the lid seal; replace if cracked or warped |
| Too much food loaded | Only load 1-2 weeks’ worth at a time |
| Feeder in direct sunlight | Move to a cool, shaded location |
| Oils in kibble going rancid | Choose a feeder with sealed hopper (Petkit’s desiccant system is excellent) |
Freshness Timeline
| Duration in Hopper | Kibble Condition | Action |
|---|---|---|
| 0-7 days | Fresh | No action needed |
| 7-14 days | Slightly less crisp | Add desiccant if humid climate |
| 14-21 days | Noticeable staleness | Refill with fresh kibble |
| 21+ days | Stale, possible rancid oils | Discard and clean hopper thoroughly |
Problem #11: Cat or Dog Breaking Into the Feeder
Cats are persistent. Dogs are strong. Both can defeat a poorly designed feeder.
Common Break-In Methods and Defenses
| Attack Method | Which Pets Do This | Defense |
|---|---|---|
| Paw fishing through the chute | Cats, small dogs | Choose feeders with an angled or twisted chute design |
| Knocking feeder over | Large cats, all dogs | Secure to wall with adhesive strips, or choose a heavy base model |
| Prying lid open | Clever cats, large dogs | Use feeders with locking lids (PetSafe, PetLibro have twist-lock) |
| Pushing bowl to trigger sensor | Cats | Disable motion-based dispensing if available |
| Chewing plastic parts | Dogs | Choose stainless steel construction models |
Most Pet-Proof Feeders
| Feeder | Anti-Tamper Features |
|---|---|
| PetSafe Smart Feed | Twist-lock lid, heavy base (8 lbs) |
| PetLibro Granary | Locking hopper, angled chute |
| SureFeed Microchip | Only opens for authorized pet’s chip |
| Whisker Feeder-Robot | Sealed chamber, heavy stainless steel |
Problem #12: Feeder Completely Dead {#problem-12}
No lights, no motor, no response at all. Before assuming the worst:
Step-by-Step Diagnosis
Step 1: Check power source
- Try a different outlet (the outlet may be the problem)
- Try a different AC adapter of the same voltage (if you have one)
- Test with batteries only (remove AC adapter)
Step 2: Hard reset
- Unplug AC and remove batteries
- Wait 5 full minutes
- Reinstall batteries, then plug in AC
- Press and hold the power/reset button for 10-15 seconds
Step 3: Check for physical damage
- Inspect the power cord for cuts or fraying
- Check for water damage (look for corrosion on circuit board through ventilation openings)
- Look for swollen or leaking batteries inside the compartment
Step 4: If nothing works
| Action | Details |
|---|---|
| Check warranty | Most feeders have 1-2 year warranties |
| Contact manufacturer | Have model number, purchase date, and problem description ready |
| Check retailer return policy | Amazon offers easy returns within 30 days |
| Document the issue | Take photos/videos for warranty claims |
💡 Temporary solution while waiting for repair/replacement: Use a gravity pet feeder or manual feeding schedule until your smart feeder is fixed.
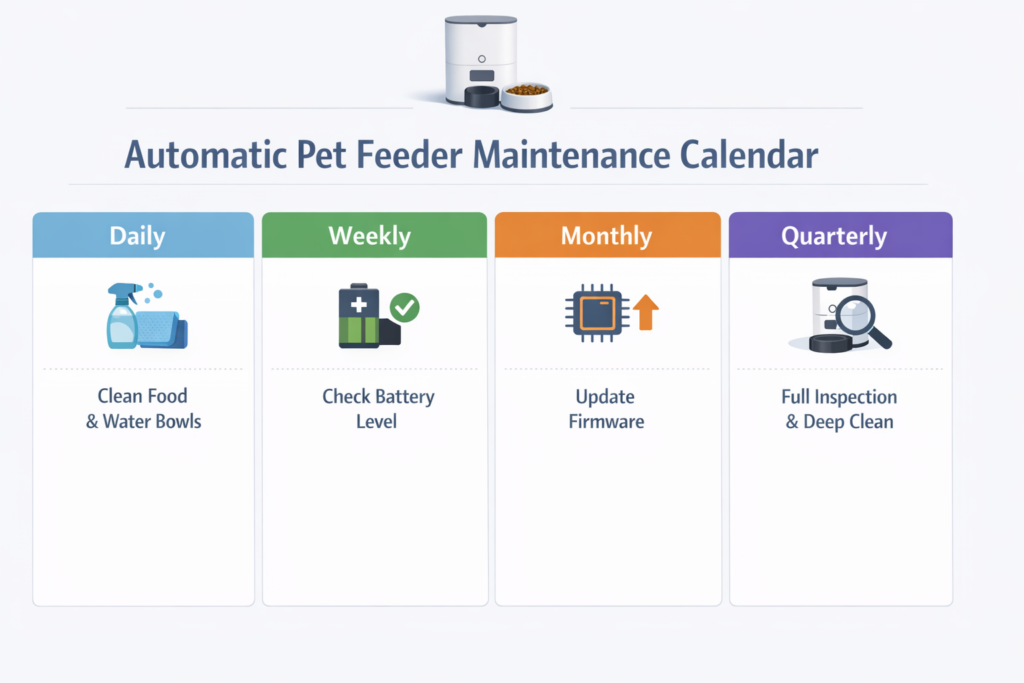
Preventive Maintenance Schedule
The best troubleshooting is prevention. Follow this maintenance schedule to avoid most problems:
When to Contact Manufacturer Support
Not every problem is a DIY fix. Contact the manufacturer when:
- ❌ Motor runs but dispensing wheel doesn’t turn (internal gear failure)
- ❌ Burning smell or excessive heat from the base unit
- ❌ Water damage or visible circuit board corrosion
- ❌ Repeated firmware update failures
- ❌ Feeder randomly dispenses large amounts of food at once (safety hazard)
- ❌ Screen/display malfunctions or shows error codes
Manufacturer Support Contacts
Frequently Asked Questions {#faq}
Why is my automatic pet feeder not dispensing food?
The most common causes are: (1) food jam from oversized or irregularly shaped kibble, (2) empty hopper that looks full but has a bridge of stuck kibble at the top, (3) low or dead batteries if running on battery power, or (4) misaligned hopper not properly seated on the base. Start with Problem #1 above.
How do I fix a jammed automatic feeder?
Unplug the feeder, remove the food hopper, and clear all stuck kibble from the dispensing chute. Use compressed air to remove fine particles. Reassemble and test with a manual dispense. To prevent future jams, use kibble sized 5-12mm and never fill past the MAX line. See our detailed jam fix.
Why won’t my WiFi pet feeder connect to the app?
The #1 reason: your router is broadcasting 5GHz and the feeder only supports 2.4GHz. During setup, make sure your phone is on the 2.4GHz band. Also enable Bluetooth and Location Services on your phone, keep the feeder within 3 meters of the router during pairing, and try power cycling both devices. Full guide in Problem #3.
My automatic feeder dispenses too much or too little food. How do I fix it?
Recalibrate portions through the app. Different kibble sizes and shapes affect how much food fits through the dispensing mechanism per rotation. Weigh the actual output with a kitchen scale, then adjust your portion setting to match your target. Always recalibrate when switching kibble brands. Details in Problem #2.
How often should I clean my automatic pet feeder?
- Daily: Wipe the food bowl
- Weekly: Clean the dispensing chute and hopper opening
- Monthly: Full deep clean—disassemble removable parts, wash with warm soapy water, dry completely
- Never submerge the base unit or electronic components in water
For a complete schedule, see our maintenance guide above.